📖 User Guide
This user Guide is updated regularly. It allows you to enter in the details to learn how to use the editor.
|
📄 View manual in PDF format Listen in voice mode :  ParticlesLast update : January 05, 2026🔗 General settingsAlright, you have created your particle system and now need to configure it to achieve the effect you want.Usually, it is best to follow a logical order to progressively build the desired result. Let’s start by taking a look at the General settings panel: 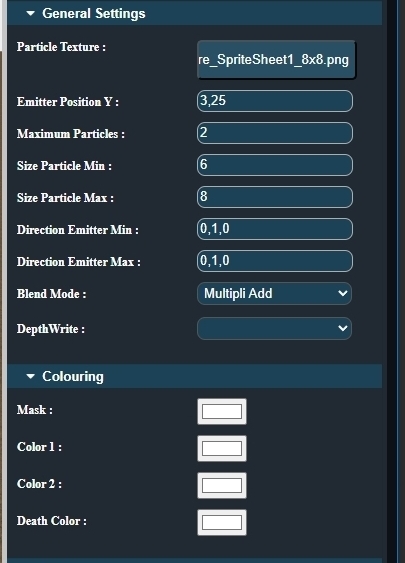
This panel is designed to let you edit the main properties in a logical sequence. * The first thing to do is to select the particle texture. Clicking the button opens the library containing all available particle images, allowing you to quickly find the one that fits your needs. 🖼️ * Next, adjust the Y position of the particle emission. Should the particles be emitted from the ground, or higher up in the air? 🌫️ * Then, define the maximum number of particles you want to emit. This can be 100, 500, 1000, and so on. Be careful with high values: this is where you need to find a balance between visual quality and performance. ⚖️ * After that, set the minimum and maximum size of the particles. Each particle will have a random size between these two values. * Next comes the minimum and maximum direction, defined on the X, Y, and Z axes (X = left / right, Y = up / down, Z = forward / backward). Use values like -1 or 1 to define directions: -1 represents left, down, or backward depending on the axis. 🧭 * Then, choose the Blend Mode, which defines how particles are blended together: - ONEONE: Colors are added together without alpha transparency affecting the result (default). - STANDARD: Colors are blended using the particle alpha. - ADD: Colors are added, but only the particle color uses alpha. - MULTIPLY: Colors are multiplied and combined. - MULTIPLYADD: Two render passes using MULTIPLY and ADD. * Finally, Depth Write (yes or no) determines whether particles write depth information to the depth buffer. This can help prevent other draw calls from rendering over the particles. 🧱 This panel is also linked to the "Colouring" panel, which allows you to modify particle colors: Mask: Applies a mask to the texture to filter certain colors or parts of the alpha channel. Color 1: The base color of the particle during its lifetime. Color 2: A secondary color that is blended or mixed with Color 1 over the particle’s lifetime. Death Color: The color the particle will have at the very end of its life. 💀 At this stage, you now have the foundation of a particle system. This is the base setup. However, you can go further to create more complex effects. ✨ This is what we will explore in the next chapter: Velocity. |