📖 User Guide
This user Guide is updated regularly. It allows you to enter in the details to learn how to use the editor.
|
📄 View manual in PDF format Listen in voice mode :  ScriptsLast update: January 08, 2026🔗 Edit a script⚙️ The init() functionTo edit a script, the first step is to determine which properties should be editable from the editor in order to configure the behavior.As seen in the previous chapter, this is done inside the init()function.We also briefly saw an example using the function this.addConfig("id", "field", options);Let’s now take a closer look at how the addConfig()function works.
The addConfig()function takes three parameters:
1️⃣ First parameter: the identifier This is not an HTML ID, but the identifier used to store and retrieve the behavior parameter value. 2️⃣ Second parameter: the HTML field type Available field types include: input, textarea, multiInput, button, scrollableDiv, image, select.3️⃣ Third parameter: the field options Available options depend on the field type being used. The most common ones are: label, id, type, defaultValue, min, max, step, checked, title, placeholder, onChange, onSelect, onInput, onClick, dropAviable.
All fields must contain at least: id, type, label, defaultValue, and an event such as onChange (or onClick for certain fields like checkboxes). The dropAviableoption allows an element to be dropped from the library.Possible values include: "Image", "Audio", "Sound", "Music", "Texture", "Video", "Mesh", "Actor".
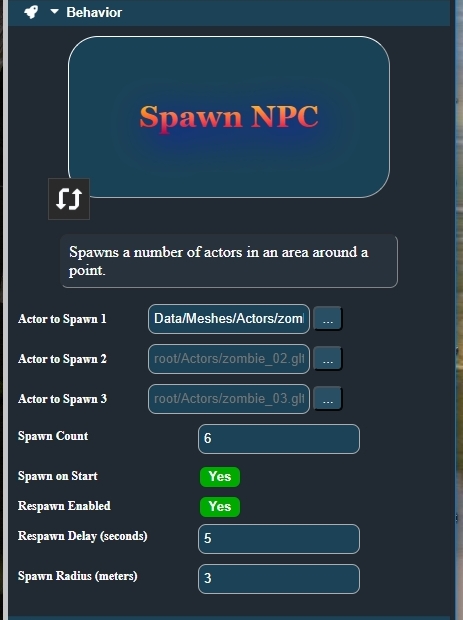
Here is a complete example: Once these fields are defined, they are automatically injected into the editor. When a 3D object receives this behavior, the init()function generates an interface similar to the following:
Once the fields are created, their values must be saved when the user modifies them. To do this, simply use savePropertyValue()inside an onChangeor onClickevent:
The savePropertyValue()function takes two parameters:- the field identifier, - the value provided by the field. It is responsible for storing the behavior parameters for the object to which it is attached. In more specific cases, it is also possible to modify an object in real time within the editor’s 3D scene using functions such as: bindRealProperty()and applyPropertyToObject().Since these are more advanced use cases, we will not cover them for now in order to keep things simple. ⚠️ At the end of the init()function, it is mandatory to add the panel to the editor using:
Without this, no fields will be displayed in the editor. You now know the essentials of the init()function. ✅
🚀 The start() functionThestart()function is called when the game starts.This is where you initialize your variables and retrieve all the properties configured in the editor. To do this, you use a function from the parent Behaviorsclass: this.getBehaviorProperty().It takes two parameters: - the identifier of the field to retrieve, - a default value if no value has been stored. Example: The start()function can also register zone triggers:
In this case, the script must contain the following static variable, declared outside of any function: This means the behavior becomes an event trigger. It can then act on itself or on other objects through logical connections. The trigger()function may then look like this:
We now reach an important concept: logical connections and chain reactions. 🔗 For this, we use the following function: In practice: - the game calls start(),- a zone event is triggered when the player enters a zone, - trigger()is executed and calls execute(),- execute()performs the action,- then triggerLinkedChain()propagates the event to connected objects.This function browses the connections between objects and triggers linked behaviors, allowing you to create simple yet powerful chain reactions. 🚀 The execute() FunctionTheexecute()function is the heart of a behavior.This is where the behavior actually does something in the scene, by interacting with 3D objects through BabylonJS (the 3D rendering engine). It is most often called by the trigger()function, but depending on the behavior, it can also be called in other ways.execute()is not a “magic” function — it simply represents the moment when an action happens.👉 Important note: This manual is not meant to teach BabylonJS in its entirety. Its goal is to show you how to use specific parts of the BabylonJS API inside a Realm-Crafting behavior script. To work efficiently with BabylonJS, I strongly recommend consulting the official documentation: 📘 BabylonJS Manual For deeper and more technical details, the complete API reference is available here: 📚 BabylonJS API And finally, the Realm-Crafting behavior documentation: 🧩 Realm-Crafting API Inside the execute()function, you have access to several predefined variables that make interaction with the game much easier:The object to which the behavior is attached: this.objectThe main game functions: this.gameThe BabylonJS scene: this.sceneThe main engine functions: this.engineThe ground (if present in the scene): this.groundThe player (the player mesh): this.playerthe camera (the camera player): this.cameraThe graphical user interface (AdvancedTexture): this.advancedTextureAll of these variables come from the parent Behaviorclass and are provided to simplify access to the most important elements of the 3D scene.For example, using this.scene, you can perform many common operations:Access the rendering engine with this.scene.getEngine()or this.engineRetrieve a mesh using this.scene.getMeshById("id")or this.scene.getMeshByName("name")The BabylonJS API is extremely well designed and relatively easy to understand, especially when compared to other 3D engines. Don’t be intimidated by its size or the number of available features — in most cases, you’ll only use about 5% of its capabilities to create effective behaviors. You will very often need to manipulate positions. Simple example: Or modify properties directly: As you can see, the pattern is always the same: use this.object, then access a property or call a function to perform an action.Let’s now look at a more complete example. This execute()function dynamically changes the texture of an object.You’ll find all the concepts covered so far in this example: Here, this.objectgives access to the material via this.object.material.We use this.getBehaviorProperty()to retrieve user-defined properties from the editor.Then, we manipulate the material and its textures using the BabylonJS API. There’s nothing particularly complex here — this example is mainly intended to give you a concrete idea of what the execute()function allows you to do.Be aware that some behaviors execute their logic directly inside the start()function.In such cases, it is common to use observablesto react to scene events.Nothing is mandatory — everything depends on the type of behavior you want to create. I strongly encourage you to explore the default scripts provided with Realm-Crafting to discover the many different approaches available. This manual presents the overall workflow. It cannot cover every possible use case, but it should give you a solid foundation to get started. 🧱 If you encounter any difficulties, don’t hesitate to ask for help or advice on the forum. I’ll be happy to help, and so will other community members — that’s what the forum is for 🤝 I hope this manual has helped you understand how all the pieces fit together. If some areas still feel unclear, feel free to point them out on the forum — I’ll expand the documentation accordingly. |