Before creating a terrain, the most important thing is to know what you plan to build on it, and what kind of landscape you want.
Will your terrain host a single large house? A dense forest? A vast city or a small village? 🤔
This is the first thing to consider, because it's not always a good idea to go for the largest terrain size possible. Many beginners — myself included at the time — used to think: "I'll make a huge terrain for a big game!"
But we quickly realize... that's not always such a great idea. Bigger doesn’t mean better.
📏 For example, in the editor demo, the terrain is 512 x 512, and it already feels large. You can do a lot with that size.
💡 Why is this important? Because performance matters. The larger your terrain, the more demanding it becomes, especially for lower-end machines.
Even though the editor optimizes performance by splitting terrains into submeshes, large terrains still come at a cost.
That’s why the maximum terrain size is limited to 2048 x 2048 — and that’s already very, very large.
Also, the bigger the terrain, the more objects you'll need to decorate it... which adds even more to the performance cost. 🎮🖥️
🛠️ How to create a terrain
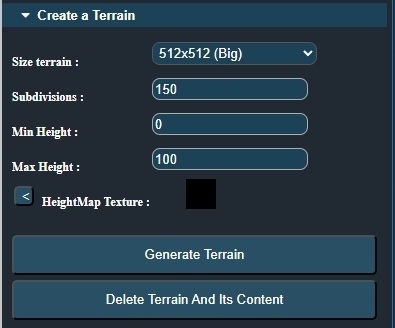
To create a terrain, open the right-side panel and expand the section titled "Create a terrain". It looks like this:
Start by choosing the size of the lot from the drop-down list. The available sizes are:
- 64 x 64
- 128 x 128
- 256 x 256
- 512 x 512 (default)
- 1024 x 1024
- 2048 x 2048
You have Min Height and Max Height, which control the elevation range of the terrain when you create the terrain with a heightmap.
The Height Map section. Here you can select an image that defines the shape of the terrain.
Choosing an all-black image will give you a flat terrain, according to the parameters set earlier.
The Top parameter allows you to change how high your land will be positioned from the grid (or mother level). Changes are real-time once your land is created. But you need to create on Update terrain to update the changes.
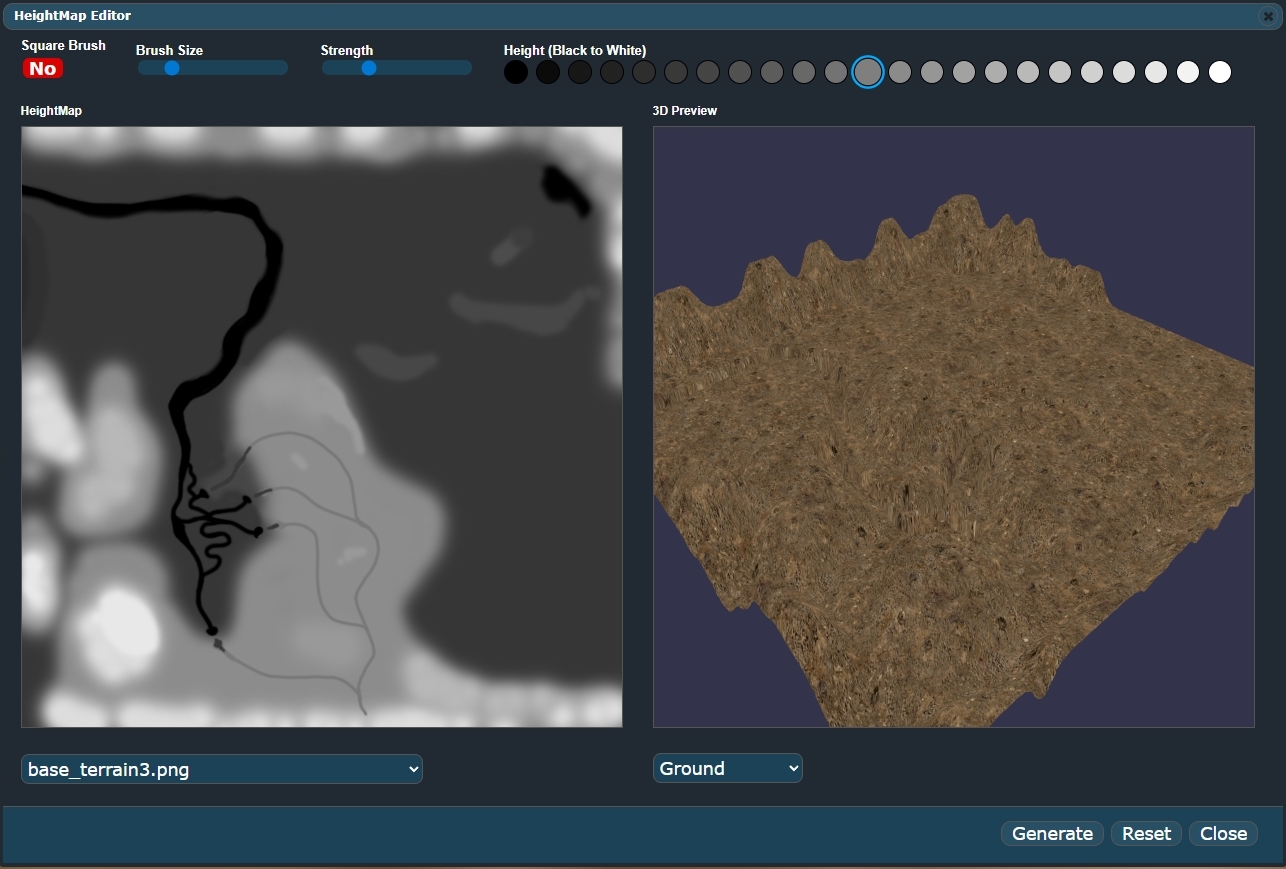
Opposite, there is the 'Heightmap Editor' button. This allows you to open an editor to draw your own heigtmap with a real-time preview.
Once the height map is selected, click the Generate button to create your land. It will display with a default ground texture.
The Terrain Update button activates after you have created a terrain to recreate it with new settings if needed.
You can also delete it with the last button if you don't want any more land.
If you have created a flat land, you will be able to shape it to your liking.
Here's an overview for the heightmap editor :
We'll explore all the sculpting tools in the next chapter: how to dig, raise terrain, create ramps, carve holes, apply random noise, erosion, and smooth out your landscape. 🪄